PyTorch is an open-source machine learning framework developed by Facebook’s AI Research lab. It is widely used for tasks involving deep learning, natural language processing, and computer vision. PyTorch provides dynamic computational graphs, enabling developers to modify them on the fly, which is particularly beneficial for research and experimentation. It supports GPU acceleration, making large-scale data processing and model training efficient. PyTorch’s intuitive syntax, flexibility, and extensive library of tools make it a popular choice among researchers and developers. Its use cases include building neural networks for image and speech recognition, natural language understanding, recommendation systems, generative models, and reinforcement learning applications.
What is PyTorch?
PyTorch is designed for both research and production purposes. Its foundation is based on Torch, a scientific computing framework with support for machine learning algorithms, but it goes beyond by integrating dynamic computation graphs and GPU acceleration. It is highly compatible with Python, making it accessible and user-friendly for developers, data scientists, and researchers.
Key Characteristics:
- Dynamic Computation Graphs: Unlike static computation graphs, PyTorch’s graphs are dynamic, meaning they are built on-the-fly, allowing greater flexibility.
- GPU Acceleration: PyTorch supports CUDA, enabling developers to speed up computations by leveraging GPUs.
- Autograd: Its automatic differentiation engine simplifies gradient computation.
Top 10 Use Cases of PyTorch
- Image Classification: PyTorch is widely used for training Convolutional Neural Networks (CNNs) for image recognition tasks, such as detecting objects or identifying diseases in medical imaging.
- Natural Language Processing (NLP): PyTorch facilitates training transformer models, like BERT and GPT, for tasks such as text generation, sentiment analysis, and translation.
- Generative Adversarial Networks (GANs): It supports developing GANs for applications like image synthesis, super-resolution, and artistic style transfer.
- Reinforcement Learning: PyTorch’s flexibility makes it an ideal choice for developing reinforcement learning models, used in robotics, gaming, and autonomous systems.
- Speech Recognition: With libraries like torchaudio, PyTorch is used for speech-to-text models and related audio signal processing tasks.
- Time Series Forecasting: Businesses leverage PyTorch for predictive modeling in areas such as stock price forecasting and energy demand prediction.
- Medical Imaging: PyTorch accelerates research in analyzing medical images for diagnostics, segmentation, and anomaly detection.
- Video Analytics: For applications like real-time surveillance and video content analysis, PyTorch provides the tools for developing robust solutions.
- Recommendation Systems: PyTorch is utilized in developing personalized recommendation engines, crucial for e-commerce and streaming platforms.
- Scientific Research: Researchers use PyTorch for experiments in fields like physics, biology, and climate science, owing to its flexibility and ease of integration with scientific workflows.
Features of PyTorch
- Dynamic Computational Graphs: Enables model changes during runtime.
- Ease of Use: Pythonic framework that integrates seamlessly with other Python libraries.
- Autograd: Automatic differentiation for complex backpropagation.
- TorchScript: Allows models to be deployed in production environments efficiently.
- Distributed Training: Supports scaling across multiple GPUs and machines.
- Robust Ecosystem: Includes libraries like torchvision, torchaudio, and torchtext for specific domains.
- Community and Documentation: Extensive community support with rich documentation and tutorials.
- Integration with PyPI and Jupyter: Simplifies installation and experimentation.

How PyTorch Works and Architecture
- Tensor Operations: Tensors are the core data structures in PyTorch, akin to NumPy arrays but with GPU acceleration.
- Dynamic Computation Graph: The computation graph is created during runtime, allowing on-the-fly modifications.
- Autograd: PyTorch’s automatic differentiation engine tracks operations and computes gradients for optimization.
- Modules and Layers: Models in PyTorch are built using modular components, such as layers in the
torch.nnmodule. - Backpropagation and Optimization: PyTorch supports backpropagation through
autogradand optimization through built-in optimizers like SGD and Adam.
How to Install PyTorch
Installing PyTorch involves a few straightforward steps, depending on your system and preferences. Below is a general guide for installation:
1. Check System Compatibility: Ensure your system supports PyTorch, and determine whether you’ll be using a CPU-only version or a version with GPU acceleration (CUDA).
2. Visit the Official PyTorch Website: Go to https://pytorch.org. The website provides an easy-to-use installation selector to help generate the appropriate command based on your environment.
3. Choose Installation Options:
- Select your PyTorch Build (Stable or Nightly).
- Choose your Operating System (Linux, macOS, or Windows).
- Specify your Package Manager (pip, conda, etc.).
- Select your Language (Python or C++).
- Choose your Compute Platform (CPU, CUDA 11.8, CUDA 12, etc.).
4. Run the Installation Command: Based on your selections, the website will generate a command. Copy and paste this command into your terminal or command prompt. For example:
- Using pip (with CUDA 12.1):
pip install torch torchvision torchaudio --index-url https://download.pytorch.org/whl/cu121- Using conda (with CUDA 11.8):
conda install pytorch torchvision torchaudio pytorch-cuda=11.8 -c pytorch -c nvidia5. Verify Installation: After installation, verify that PyTorch is installed correctly:
- Open a Python shell or Jupyter Notebook.
- Import PyTorch and check its version:
import torch
print(torch.__version__)
print(torch.cuda.is_available())  # Check if CUDA is available
Following these steps will set up PyTorch for your development needs.
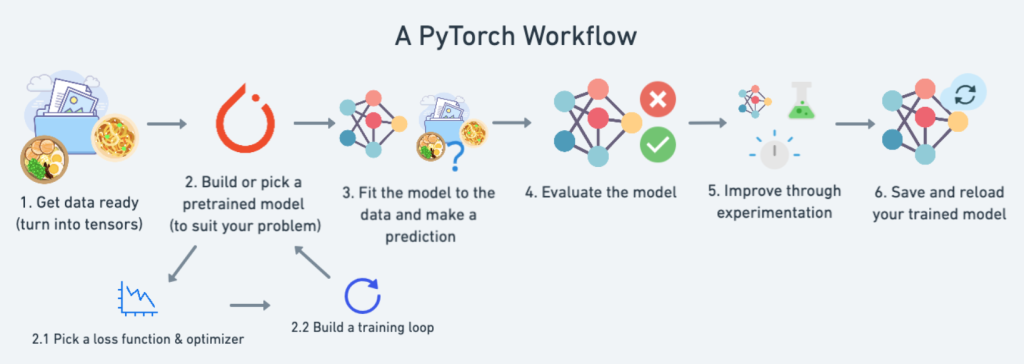
Basic Tutorials of PyTorch: Getting Started
Step 1: Importing PyTorch
import torchStep 2: Working with Tensors
# Creating a tensor
x = torch.tensor([[1, 2], [3, 4]])
print(x)

# Tensor operations
y = x + 2
print(y)
Step 3: Building a Simple Neural Network
import torch.nn as nn

# Define the model
class SimpleModel(nn.Module):
    def __init__(self):
        super(SimpleModel, self).__init__()
        self.linear = nn.Linear(10, 1)

    def forward(self, x):
        return self.linear(x)

model = SimpleModel()
Step 4: Training the Model
import torch.optim as optim

# Dummy data
inputs = torch.randn(100, 10)
labels = torch.randn(100, 1)

# Loss function and optimizer
criterion = nn.MSELoss()
optimizer = optim.SGD(model.parameters(), lr=0.01)

# Training loop
for epoch in range(100):
    optimizer.zero_grad()
    outputs = model(inputs)
    loss = criterion(outputs, labels)
    loss.backward()
    optimizer.step()
    print(f'Epoch {epoch+1}, Loss: {loss.item()}')