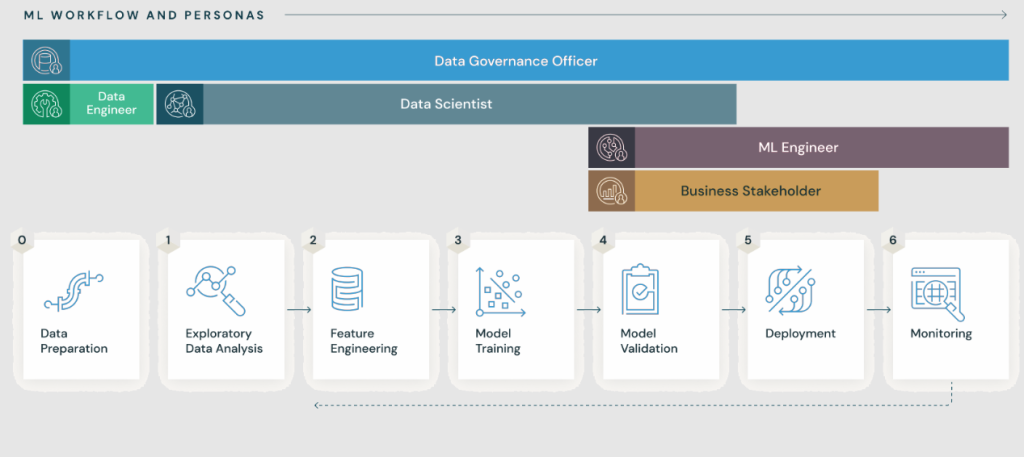
MLflow is an open-source platform designed to manage the entire machine learning lifecycle. It provides tools for experiment tracking, reproducibility, deployment, and model registry, simplifying the workflow for data scientists and machine learning engineers. MLflow is framework-agnostic, which means it works with any machine learning library or tool, making it a versatile choice for organizations.
What is MLflow?
MLflow is an end-to-end machine learning lifecycle management platform. It provides a unified interface to log experiments, package models, track results, and deploy them to production. MLflow supports any machine learning library, programming language, or deployment environment, allowing users to integrate it seamlessly into their workflows.
Key Characteristics:
- Framework Agnostic: Supports popular frameworks like TensorFlow, PyTorch, Scikit-learn, and XGBoost.
- Open-Source: Free to use and extend, with a large community of contributors.
- Modular: Composed of four key components that can be used independently or together.
Top 10 Use Cases of MLflow
- Experiment Tracking: MLflow helps track experiments, including parameters, metrics, and results, to identify the best-performing models.
- Model Registry: Manage multiple versions of machine learning models in a centralized repository for better organization and collaboration.
- Reproducibility: Log the entire machine learning workflow, ensuring that experiments can be reproduced easily in the future.
- Model Deployment: Deploy models into various environments (e.g., REST APIs, batch processing, or edge devices) using MLflow’s deployment capabilities.
- Hyperparameter Tuning: Track and compare the results of hyperparameter tuning experiments to identify the optimal configuration.
- Collaboration: Enable teams to share and compare results across different projects, enhancing collaborative development.
- Multi-Environment Support: Deploy and manage models across cloud platforms, on-premises servers, or hybrid environments.
- Integration with CI/CD: Integrate MLflow into CI/CD pipelines for continuous deployment and monitoring of machine learning models.
- Real-Time Monitoring: Monitor deployed models for performance metrics, accuracy drift, or input anomalies to ensure consistent performance.
- Audit and Compliance: Maintain a comprehensive log of experiments and models for regulatory compliance and auditing purposes.
Features of MLflow
- MLflow Tracking: Log parameters, metrics, and artifacts to keep track of experiments and results.
- MLflow Projects: Package machine learning code into reproducible and shareable formats using standardized configurations.
- MLflow Models: Standardize and package models for easy deployment across multiple platforms.
- MLflow Model Registry: Centralized repository for managing model lifecycles, including stages like development, staging, and production.
- Framework Compatibility: Works with various machine learning frameworks and programming languages.
- Deployment Flexibility: Deploy models to cloud platforms, on-premises servers, or edge devices with minimal effort.
- API and CLI Support: Provides REST APIs and command-line interfaces for automation and integration.
- Community and Ecosystem: Extensive support from an active community and integrations with third-party tools.
- Scalability: Scales to handle large numbers of experiments and models.
- Open-Source: Available for free, with the flexibility to extend and customize as needed.

How MLflow Works and Architecture
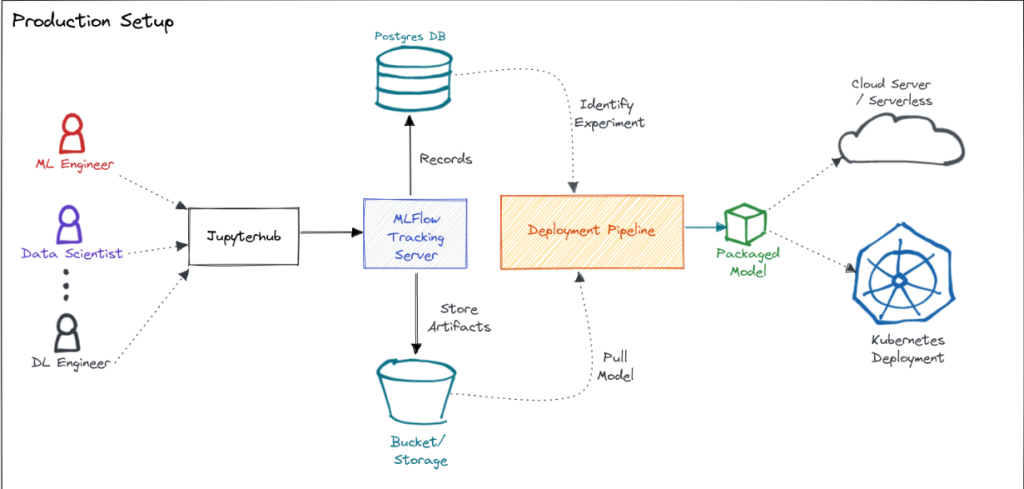
- Tracking Server: Logs and stores experiment data, including parameters, metrics, and artifacts. The server can be hosted locally or on cloud storage.
- Backend Store: Stores metadata, such as experiment and run information, in databases like SQLite, MySQL, or PostgreSQL.
- Artifact Store: Stores artifacts like models, data files, and logs in cloud storage (e.g., AWS S3, Azure Blob Storage) or local file systems.
- MLflow Components:
- MLflow Tracking: Manages experiment tracking and logs.
- MLflow Projects: Provides a standard format for packaging code.
- MLflow Models: Standardizes model packaging for deployment.
- Model Registry: Manages the lifecycle of machine learning models.
- Deployment: Supports deployment to various environments using platforms like AWS SageMaker, Azure ML, or Kubernetes.
How to Install MLflow
MLflow is an open-source platform for managing the complete machine learning lifecycle, including experimentation, reproducibility, and deployment. Installing and using MLflow in your environment is straightforward. Here’s how you can install and use MLflow programmatically.
1. Install MLflow
You can install MLflow using Python’s package manager, pip. You can install it with the following command:
pip install mlflow
This installs the latest stable version of MLflow and all its dependencies. If you want to install a specific version, you can specify the version number:
pip install mlflow==1.23.0 # Example for installing a specific version
2. Optional: Install MLflow with Extras
MLflow can be extended with additional functionality, such as support for various machine learning libraries or remote backends. If you want to use the full set of features, you can install MLflow with extras like scikit-learn, tensorflow, or pytorch:
pip install mlflow[extras]
This installs MLflow along with libraries for machine learning frameworks and cloud storage backends.
3. Verify Installation
Once MLflow is installed, you can verify the installation by running a Python script or in a Python shell:
import mlflow
print(mlflow.__version__)
This will print the version of MLflow to confirm that it is correctly installed.
4. Run MLflow Tracking Server (Optional)
If you want to use MLflow’s experiment tracking and logging features, you can set up an MLflow tracking server. This step is optional for local experimentation but necessary for centralized logging across multiple users.
To start the MLflow server, you can run the following command:
mlflow server --backend-store-uri sqlite:///mlflow.db --default-artifact-root ./mlruns
This starts the MLflow tracking server with an SQLite backend and stores artifacts locally in the ./mlruns directory.
5. Use MLflow for Model Tracking (Basic Example)
You can now use MLflow to track your machine-learning experiments. Here’s an example of how you can log a model using MLflow in Python:
import mlflow
import mlflow.sklearn
from sklearn.ensemble import RandomForestClassifier
from sklearn.model_selection import train_test_split
from sklearn.datasets import load_iris

# Load dataset
iris = load_iris()
X_train, X_test, y_train, y_test = train_test_split(iris.data, iris.target, test_size=0.2)

# Train a model
model = RandomForestClassifier()
model.fit(X_train, y_train)

# Log the model with MLflow
with mlflow.start_run():
    mlflow.log_param("n_estimators", model.n_estimators)
    mlflow.log_param("max_depth", model.max_depth)

    # Log the model
    mlflow.sklearn.log_model(model, "model")

    # Log metrics
    accuracy = model.score(X_test, y_test)
    mlflow.log_metric("accuracy", accuracy)

    print("Model logged to MLflow")
6. Access MLflow UI
To visualize the results of your experiments, you can use MLflow’s UI. By default, the tracking server runs at http://localhost:5000.
To open the MLflow UI, run the following command:
mlflow uiThen, navigate to http://localhost:5000 in your browser to access the dashboard, where you can view logs, metrics, parameters, and models.
Summary:
To install MLflow, use pip install mlflow. Optionally, you can install extras for extended functionality. Once installed, you can verify the installation and use MLflow for tracking your experiments, logging models, and monitoring metrics. For centralized tracking across multiple users, you can set up a tracking server. MLflow provides a convenient UI for reviewing logged data and experiments.g experiments.
Basic Tutorials of MLflow: Getting Started
Step 1: Install MLflow
Install MLflow in your Python environment using pip.
pip install mlflowStep 2: Log Parameters and Metrics
Use MLflow’s API to log parameters, metrics, and artifacts.
import mlflow

# Start a new MLflow run
with mlflow.start_run():
    mlflow.log_param('alpha', 0.5)
    mlflow.log_param('l1_ratio', 0.1)
    mlflow.log_metric('accuracy', 0.95)
Step 3: Log and Save a Model
Save and log your trained model with MLflow.
from sklearn.linear_model import LogisticRegression
import mlflow.sklearn

# Train a model
model = LogisticRegression()
model.fit(X_train, y_train)

# Log the model
mlflow.sklearn.log_model(model, 'logistic_regression_model')
Step 4: View Results in the UI
Start the MLflow UI to visualize experiments:
mlflow uiStep 5: Deploy the Model
Deploy the model as a REST API or use platforms like AWS SageMaker:
mlflow models serve -m models:/logistic_regression_model/1