IBM QRadar is a leading Security Information and Event Management (SIEM) platform that helps organizations detect, investigate, and respond to cyber threats. It collects and analyzes data from various sources, such as network devices, endpoints, cloud platforms, and applications, to provide real-time visibility into security events. QRadar leverages advanced analytics, threat intelligence, and AI to identify anomalies and automate threat detection, enabling security teams to respond swiftly and effectively.
What is IBM QRadar?
IBM QRadar is a comprehensive SIEM solution designed to provide centralized monitoring and management of security incidents. It uses advanced machine learning and rule-based detection to identify suspicious activities and correlates events across the entire IT infrastructure. With its ability to scale and integrate with other security tools, QRadar is ideal for businesses of all sizes seeking to strengthen their security posture.
Key Characteristics of IBM QRadar:
- Real-Time Threat Detection: Continuously monitors and analyzes security events to identify threats as they happen.
- Centralized Security Management: Consolidates logs and events from diverse sources into a single platform.
- Advanced Analytics: Uses machine learning and AI for anomaly detection and root cause analysis.
- Integration with Security Tools: Works seamlessly with third-party security tools and IBM’s broader security ecosystem.
Top 10 Use Cases of IBM QRadar
- Threat Detection and Response
- Identifies and mitigates cyber threats in real time, such as malware, ransomware, and insider threats.
- User Behavior Analytics (UBA)
- Monitors user activities to detect anomalies that may indicate compromised accounts or malicious insiders.
- Compliance Management
- Ensures compliance with regulations like GDPR, HIPAA, and PCI DSS by generating detailed audit trails and reports.
- Cloud Security Monitoring
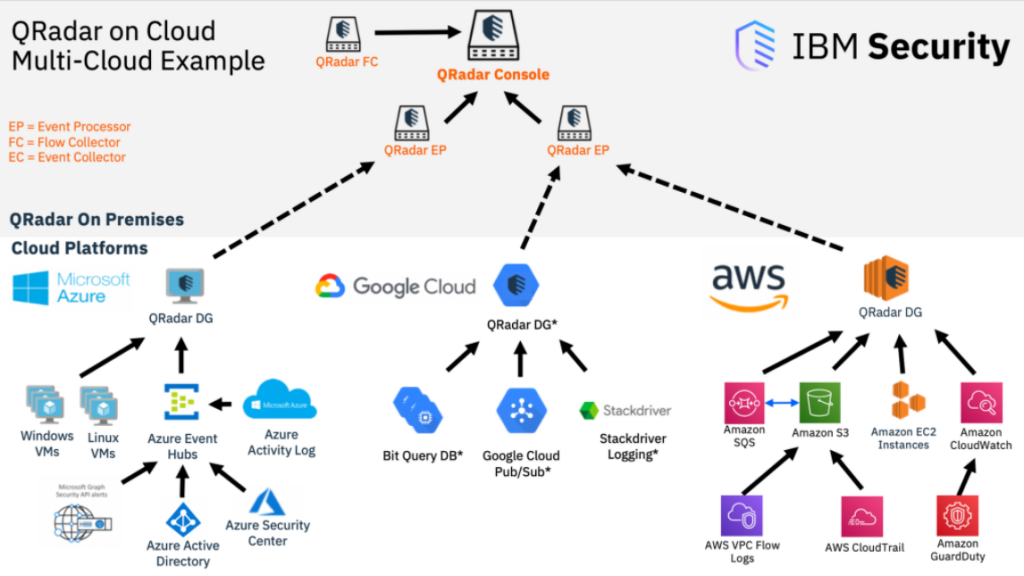
- Secures cloud environments by analyzing activity logs from platforms like AWS, Azure, and Google Cloud.
- Network Security Monitoring
- Tracks network traffic to detect unauthorized access, lateral movement, or data exfiltration.
- Incident Investigation
- Provides forensic analysis capabilities to investigate the root cause of security incidents.
- Threat Intelligence Integration
- Integrates global threat intelligence feeds to enhance detection and mitigation of emerging threats.
- Vulnerability Management
- Correlates vulnerabilities with threat data to prioritize remediation efforts effectively.
- Advanced Persistent Threat (APT) Detection
- Identifies sophisticated attacks that evade traditional defenses by analyzing patterns over time.
- Security Orchestration and Automation (SOAR)
- Automates response workflows to reduce manual intervention and improve efficiency.
Features of IBM QRadar
- Log Management and Correlation – Collects and normalizes log data from various sources for centralized analysis.
- Threat Intelligence Integration – Leverages threat intelligence feeds to stay updated on the latest threats.
- Behavioral Analytics – Detects anomalies in user, network, and application behaviors using machine learning.
- Real-Time Alerts – Provides instant alerts for high-priority incidents, reducing detection and response times.
- Incident Forensics – Offers deep forensic analysis to understand the root cause and scope of attacks.
- Customizable Dashboards – Enables tailored visualizations for security metrics and activities.
- Compliance Reporting – Generates automated reports to demonstrate compliance with regulatory standards.
- Cloud and On-Premises Support – Supports hybrid environments, integrating data from both cloud and on-premises infrastructures.
- Role-Based Access Control (RBAC) – Ensures secure access to the platform with granular role definitions.
- Integration with Security Tools – Connects with firewalls, EDR solutions, and vulnerability scanners for comprehensive security coverage.

How IBM QRadar Works and Architecture
1. Data Collection and Normalization
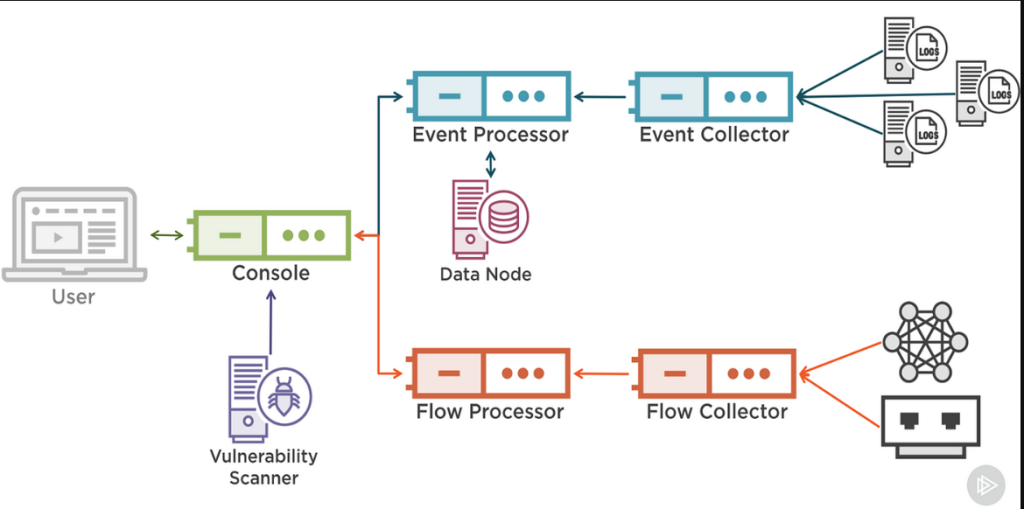
- QRadar collects logs, events, and flows from various data sources, including firewalls, endpoints, servers, and cloud services.
- It normalizes and enriches the data to make it consistent and actionable.
2. Threat Detection and Correlation
- Uses advanced correlation rules and machine learning models to detect anomalies and suspicious behaviors.
- Correlates events across sources to identify potential attack patterns.
3. Incident Management
- Generates prioritized alerts for security incidents based on severity and impact.
- Provides detailed insights for effective incident investigation and response.
4. Integration and Extensibility
- Integrates with IBM’s SOAR platform and third-party tools for automation and orchestration.
- Supports custom scripts and APIs to extend functionality.
How to Install IBM QRadar
IBM QRadar is a comprehensive Security Information and Event Management (SIEM) solution that helps organizations detect, prioritize, and respond to security threats in real-time. Installing QRadar involves deploying the platform on either hardware or virtual environments, configuring network interfaces, and installing required services. Although the installation of QRadar itself is not done via pure “code” (since it involves setting up a server), you can automate parts of the installation process using scripts, commands, and system configurations.
Here’s a step-by-step guide to help you install IBM QRadar programmatically, primarily on Linux (as QRadar runs on Linux-based systems).
1. System Requirements
Before installing QRadar, ensure that your system meets the hardware and software requirements:
- Operating System: QRadar is typically installed on Red Hat-based Linux systems (RHEL, CentOS).
- RAM: 16 GB minimum, but recommended 32 GB or more for larger environments.
- Disk Space: 500 GB minimum for the appliance (1 TB or more recommended).
- Processor: At least 2 processors (4 cores or more).
2. Download the QRadar ISO
- Download QRadar ISO from the IBM Fix Central website. You will need a valid IBM QRadar license to access the ISO and updates.
- The ISO will typically include a bootable image that can be used for installation.
3. Create a Bootable USB or Virtual Disk for QRadar Installation
Once you have the QRadar ISO, you can create a bootable USB drive or virtual disk if you are installing on a virtual machine (VM).
For USB Installation:
- Use a tool like Rufus (for Windows) or dd (for Linux) to create a bootable USB.
For Virtual Machine Installation:
- If you’re using a VM (such as VMware or Hyper-V), attach the QRadar ISO to the virtual machine’s CD/DVD drive.
4. Install QRadar on a Virtual Machine or Physical Server
Step 1: Boot the System Using the QRadar ISO
After preparing the installation media, boot the machine from the QRadar ISO.
For a physical machine, this would typically involve restarting and booting from the USB or CD/DVD.
For a VM, ensure that the VM is set to boot from the ISO file.
Step 2: Follow the Installation Wizard
QRadar installation is typically guided by an interactive wizard that sets up the system. The following steps are part of the typical installation process:
- Choose Installation Mode: Select “Install” from the options.
- Select Disk: Choose the disk where QRadar will be installed.
- Set up Network Interfaces: Configure network interfaces (IP address, gateway, DNS) based on your environment.
- Configure Hostname: Set a unique hostname for the QRadar system.
- Configure Root Password: Set a strong root password for administrative access.
- License Agreement: Accept the IBM QRadar license terms.
Step 3: Reboot the System
After the installation completes, the system will automatically reboot into the QRadar environment.
5. Automating QRadar Installation Using CLI
Although QRadar installation is mostly manual through the installer, once QRadar is installed, you can automate various post-installation tasks using the command line. For instance, automating network configurations, updates, and patch management.
Step 1: Install System Updates
Once QRadar is installed, you may want to ensure that the system is up to date with the latest patches and updates. Use the following commands:
# Update the system
sudo yum update -y

# Install any QRadar updates (if available)
sudo /opt/qradar/bin/secure_installation
Step 2: Configure Network Settings Automatically (Optional)
You can configure network interfaces programmatically using configuration files like /etc/sysconfig/network-scripts/ifcfg-eth0 or using nmcli (NetworkManager command-line tool).
Example to configure a static IP address for the network interface eth0:
# Open network config file for eth0
sudo vi /etc/sysconfig/network-scripts/ifcfg-eth0

# Set static IP details
BOOTPROTO="static"
IPADDR="192.168.1.100"
NETMASK="255.255.255.0"
GATEWAY="192.168.1.1"
DNS1="8.8.8.8"

# Restart the network service
sudo systemctl restart network
Step 3: Install QRadar Updates and Patches Programmatically
To install updates or patches on QRadar from IBM’s repositories, use the following command:
# Check for available updates
sudo yum check-update

# Install updates
sudo yum update qradar*
Step 4: Start QRadar Services
After installation, you can start QRadar services using the following command:
# Start QRadar services
sudo systemctl start hostcontext
sudo systemctl start hostservices
You can verify if services are running correctly:
# Check the status of QRadar services
sudo systemctl status hostcontext
sudo systemctl status hostservices
6. Access QRadar Web Interface
Once QRadar is installed and running, you can access its web interface by navigating to the system’s IP address:
https://<QRadar_IP_Address>:443
Log in with the default admin credentials (you should change these after installation).
7. Post-Installation Tasks and Configuration
After installation, configure your environment:
- Set up data sources such as Syslog, SNMP, or security logs.
- Configure log sources to send data to QRadar for analysis.
- Set up rules and offenses for real-time monitoring.
- Review dashboards and reports to ensure QRadar is monitoring the correct systems.
8. Automating QRadar Updates (Optional)
You can automate the process of updating QRadar with new patches or security updates using cron jobs or other scheduling mechanisms. Example:
# Create a cron job to automatically update QRadar daily
sudo crontab -e
Add a cron job for daily updates:
0 2 * * * /usr/bin/yum update -y qradar* >/dev/null 2>&1
Basic Tutorials of IBM QRadar: Getting Started
Step 1: Log in to the QRadar Console
- Use your admin credentials to access the web-based management console.
Step 2: Add Data Sources
- Navigate to Admin > Log Sources.
- Add log sources by specifying the device type, IP, and configuration details.
Step 3: Set Up Correlation Rules
- Go to Rules and create new rules to detect specific attack scenarios or customize existing ones.
Step 4: Monitor Alerts
- Access the Dashboard to monitor real-time alerts and view high-priority incidents.
Step 5: Investigate Incidents
- Use the Offenses tab to investigate security events and analyze logs for forensic data.
Step 6: Generate Reports
- Navigate to the Reports section.
- Generate compliance, threat analysis, or operational efficiency reports.