What is .net ?
.NET is a software development framework developed by Microsoft. It provides a platform for building different types of applications, including web, desktop, mobile, and gaming applications.
What is top use cases of .net?
Some common use cases for .NET include:
1. Web application development: Building dynamic and scalable web applications using technologies like ASP.NET and ASP.NET Core.
2. Desktop application development: Creating Windows desktop applications using Windows Forms or Windows Presentation Foundation (WPF).
3. Mobile application development: .NET can be used to build native mobile applications for iOS, Android, and macOS.
4. Game development: .NET can be used to build games for a variety of platforms, including Windows, macOS, Linux, and mobile devices.
What are feature of .net?
Here are some of the features of .NET:
- A rich ecosystem of frameworks and libraries: .NET has a rich ecosystem of frameworks and libraries that make it easy to build applications of all types.
- Support for multiple languages: .NET supports multiple programming languages, including C#, Visual Basic, and F#.
- Cross-platform support: .NET is cross-platform, so you can build applications that run on Windows, macOS, and Linux.
- Open source: .NET is open source, so you can contribute to its development and use it for free.
What is the workflow of .net?
The workflow of .net involves several stages, including:
- Coding: Developers write code in a .net-supported language, such as C# or VB.net, using the .net framework and libraries.
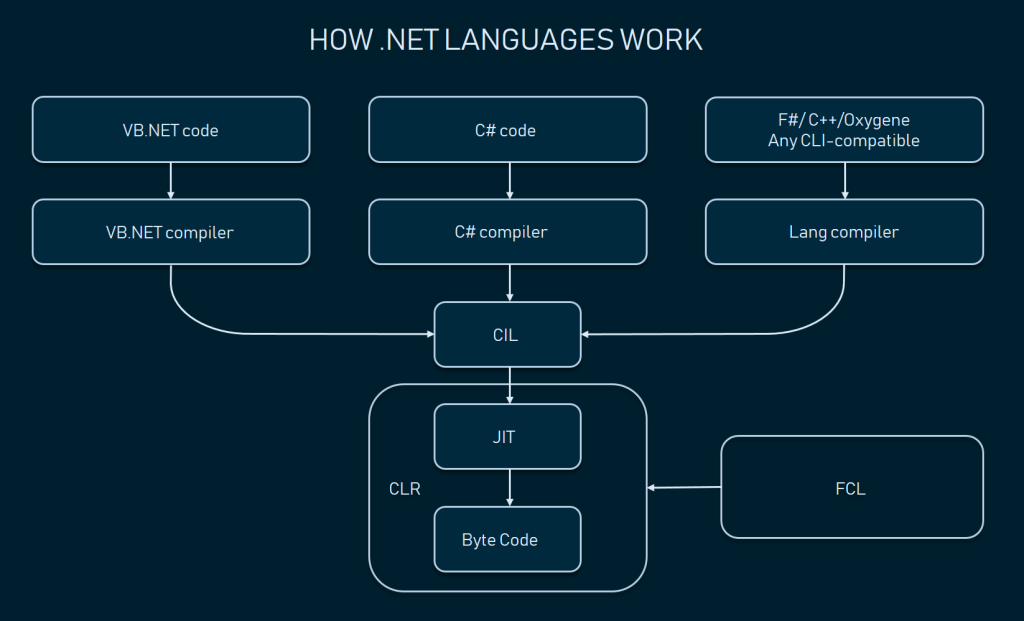
- Compilation: The code is compiled into an intermediate language (IL) using the .net compiler.
- Just-In-Time (JIT) Compilation: The IL code is then compiled into machine code by the JIT compiler at runtime, optimizing performance.
- Execution: The compiled machine code is executed by the .net runtime environment, which provides memory management, security, and other runtime services.
- Debugging and Testing: Developers can debug and test their .net applications using integrated development environments (IDEs) like Visual Studio.
How .net Works & Architecture?

The workflow of .NET involves the following steps:
1. Designing the application structure and defining requirements.
2. Writing code using an integrated development environment (IDE) such as Visual Studio or Visual Studio Code.
3. Compiling the code into an intermediate language (IL) called Common Intermediate Language (CIL).
4. During runtime, the Just-In-Time (JIT) compiler converts the IL code into machine code that can be executed by the specific operating system.
How to Install and Configure .net?
To install and configure .NET, you need to follow these steps:
- Go to the .NET download page: https://dotnet.microsoft.com/en-us/download.
- Choose the version of .NET that you want to install.
- Click the Download button.
- Follow the on-screen instructions to complete the installation.
Once .NET is installed, you need to configure it. The configuration steps vary depending on the operating system that you are using.
Windows
- Open a command prompt.
- Type the following command:
dotnet config --listThis will list all of the configuration settings for .NET.
- To change a configuration setting, type the following command:
dotnet config <setting> <value>For example, to change the default output directory for .NET projects, you would type the following command:
dotnet config appsettings.json outputDir "C:\MyProjects"Linux
- Open a terminal window.
- Type the following command:
dotnet configure --listThis will list all of the configuration settings for .NET.
- To change a configuration setting, type the following command:
dotnet configure <setting> <value>For example, to change the default output directory for .NET projects, you would type the following command:
dotnet configure appsettings.json outputDir /home/myuser/ProjectsmacOS
- Open a Terminal window.
- Type the following command:
dotnet configure --listThis will list all of the configuration settings for .NET.
- To change a configuration setting, type the following command:
dotnet configure <setting> <value>For example, to change the default output directory for .NET projects, you would type the following command:
dotnet configure appsettings.json outputDir /Users/myuser/ProjectsStep by Step Tutorials for .net for hello world program
To create a “Hello, World!” program using .NET, follow these step-by-step instructions:
Step 1: Install .NET SDK
- Go to the official Microsoft website (https://dotnet.microsoft.com/download/dotnet) and download the .NET SDK.
- Run the downloaded installer and follow the instructions to install .NET SDK on your machine.
Step 2: Choose an IDE or Text Editor
- You can use various IDEs (Integrated Development Environments) or even a simple text editor to write .NET programs. Some popular choices include Visual Studio, Visual Studio Code, or even Notepad++.
- Install your preferred IDE or text editor if you haven’t already.
Step 3: Create a New Console Application Project
- Open your chosen IDE or text editor and create a new project.
- For Visual Studio:
- Go to File > New > Project.
- Choose “Console App (.NET Core)” under C#.
- Set a project name and location, then click “Create.”
- For Visual Studio Code or other editors:
- Open a new terminal or command prompt.
- Navigate to the desired directory for your project.
- Run the command
dotnet new console -n HelloWorldto create a new console application project named “HelloWorld.”
Step 4: Write the “Hello, World!” Code
- Open the newly created project in your IDE or editor.
- Locate the file named
Program.cs, which contains the code for the console application. - Replace the existing code with the following code snippet:
using System;
using System;

namespace HelloWorld
{
    class Program
    {
        static void Main(string[] args)
        {
            Console.WriteLine("Hello, World!");
        }
    }
}
Step 5: Run the Program
- Save the changes made to
Program.cs. - In your IDE, click the run button (usually a green arrow) to compile and execute the application.
- If you’re using the terminal or command prompt, navigate to the project directory and run the command
dotnet run.
Step 6: Verify Output
- After running the program, the console should print “Hello, World!”.
Congratulations! You have successfully created a “Hello, World!” program using .NET.